To measure Thoron using a Radon Sniffer, the following process can be followed:
Pre-Test Setup:
Before starting, ensure your equipment is prepared for an accurate reading:
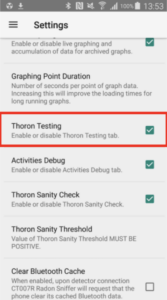
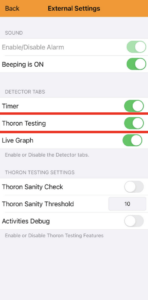
- Enable Thoron Testing: Open the app settings and ensure the Thoron Testing tab is enabled.
- Flush the Cell: Let the Sniffer run for a few minutes in clean air to ensure the unit’s cell is clean and free of existing Radon progeny.
- Maintain Power: Leave the Sniffer running between tests. Turning it off resets the algorithm and may cause inaccurate results.
- Identify Source: Locate the intended source to be tested for Thoron.
The Measurement Sequence:
The Radon Sniffer App automates this sequence once started. Follow these steps precisely:
- Start Sequence: Press the “Start Sequence” button in the app.
- Fill the Sniffer (90 Seconds): You have 10 seconds to place the input tube on the source. Hold it there for 90 seconds to fill the cell.
- Remove the source (300 Seconds): Remove the Sniffer from the source.
- Monitor Progress: The app will display a countdown and the current stage of the procedure. Do not abort the procedure prematurely, as this prevents the algorithm from accounting for built-up progeny.
How the Procedure Works
The purpose of the Thoron testing procedure is to determine the ratios of Radon (Rn-222) and Thoron (Rn-220) present in sampled air. The Radon Sniffer detects Radon (Rn-222) by counting alpha particles from Radon decay. However, both Rn-222 and Rn-220 (Thoron) emit alpha particles, meaning the detector cannot distinguish between the two. Fortunately, the decay chains of each isotope behave quite differently.
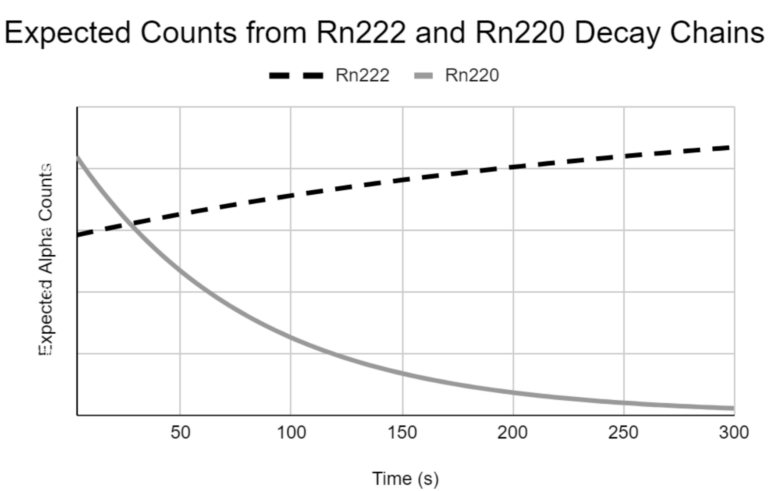
As shown on the above graph, alpha counts from Radon and its progeny will increase over time, whereas alpha counts from Thoron and its progeny decrease quickly. During the measurement period, the procedure will compare the received counts to the behaviour of each element’s decay chain, and determine the ratios and activities of Rn-222 and Rn-220.
The power point slides can be downloaded here.