To check for radon in water using a Radon Sniffer, the following process can be followed.
The information below is deprived from Bill Brodhead’s method described in this paper.
Equipment Setup
- Radon Sniffer
- Sampling Jar: A 1250 mL glass jar specialized with a lid containing two sealable valves and a volume marker indicating the 250mL level. See instructions on how to make one here.
- Hose Kit: A sampling hose with a swivel connector and flexible tubing.
- Smartphone with the Radon Sniffer app installed and connected via Bluetooth.
Step 1: Collecting the Water Sample
- Flush the System: Run the water for several minutes to ensure you are sampling fresh water, rather than water sitting in the pipes. Water that has been standing will have radon slowly bleed out, decreasing the level of radon in the sample. To take the most accurate measurement we want to measure the maximum amount of radon in the water.
- Fill the Jar: Attach one end of the hose to the water source and place the other end into the jar with its lid removed. Gently fill the jar until it reaches the 250 mL marker. When filling the water testing jar it is important to not agitate the water, doing so will cause radon to escape.
- Seal: Remove the hose and immediately screw the lid onto the jar. Ensure both valves on the lid are closed.
Step 1: Collecting the Water Sample
- Flush the System: Run the water for several minutes to ensure you are sampling fresh water, rather than water sitting in the pipes. Water that has been standing will have radon slowly bleed out, decreasing the level of radon in the sample. To take the most accurate measurement we want to measure the maximum amount of radon in the water.
- Fill the Jar: Attach one end of the hose to the water source and place the other end into the jar with its lid removed. Gently fill the jar until it reaches the 250 mL marker. When filling the water testing jar it is important to not agitate the water, doing so will cause radon to escape
- Seal: Remove the hose and immediately screw the lid onto the jar. Ensure both valves on the lid are closed.
Step 2: Agitation
- Check Seal: Verify the lid is tight and valves are closed.
- Agitate: Shake the jar vigorously for 60 seconds. This agitates the water and releases the dissolved radon into the air headspace inside the jar.
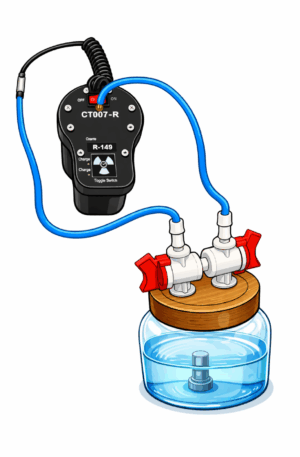
Step 3: Connect the Radon Sniffer
- Turn the Radon Sniffer on and connect to the companion app, navigate to the “Water” tab in the interface. If you don’t see this tab as an option, it needs to be turned on in the settings.
- Navigate to the settings by tapping the three lines in the top left corner of the screen, select “Settings” and scroll until the “Radon in Water Testing” option appears on the list and toggle it on. When it is turned on, there will be a “Water” tab when you are in the detector view.
- Turn the Sniffer’s internal pump OFF.
- Connect the input tube of the Sniffer to one of the jar’s valves.
- Connect the Sniffer’s exhaust port to the other valve on the jar using tubing.
- Once connected, open both valves on the radon sampling jar.
- Turn the Sniffer’s internal pump back ON.
Step 4: Recording the Reading
- Monitor the Graph: Switch the app to the “Graph” display. A 30 to 60-second averaging interval is recommended for clear visualization.
- Wait for Plateau: Allow the system to run for 7 to 8 minutes. The 5 minute rolling average eventually plateau and stabilize.
- Record: Note the “Radon 5min Avg” displayed on the app once the reading has stabilized.
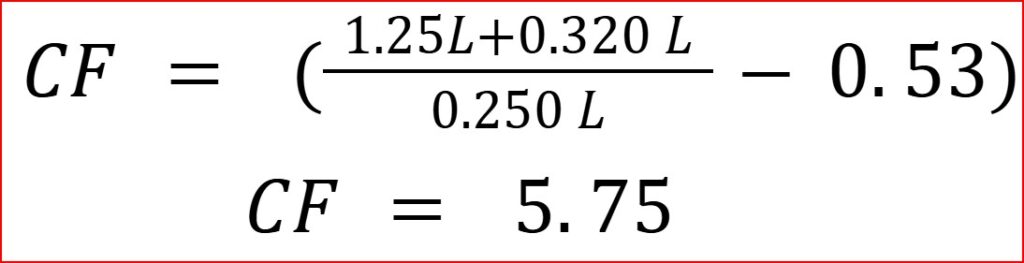
Step 5: Calibration Factor
The calibration factor converts the concentration of Radon in the air to the concentration of Radon in the water. This factor depends on your specific experimental setup and is calculated using the following formula:
Formula:

Variables:
•Vj = Total volume of the jar in Litres
•Vw = Volume of the water sample in Litres
•0.320 L = Volume of sniffer scintillation cell and additional tubing
For a detailed derivation of this formula, see Bill Brodhead’s report on measuring radon in water. Note that Bill’s report applied an additional correction factor of 1.23; this correction has since been incorporated into updated Sniffer units and should not be applied separately.
Calibration Factor Calculation Example
For a 1250 mL jar and 250 mL water sample, the calibration factor would be:
Step 6: Determining the Concentration of Radon in Water
Once you have calculated your Calibration Factor (CF) from Step 6 and recorded your stable air measurement from the Sniffer, you can find the final water concentration using this formula:
Formula: Radon_Water = Air_Reading * CF
Variables:
• Radon_Water: The final concentration of radon in the water sample (pCi/L).
• Air_Reading: The stable 5-minute average recorded from the Sniffer (pCi/L).
• CF: The Calibration Factor calculated in Step 6.
Example Calculation: If your Sniffer reading (Air_Reading) is 1100 pCi/L and your CF is 5.75:
1100 * 5.75 = 6325 pCi/L
Result: The concentration of radon in the water sample is 6325 pCi/L.
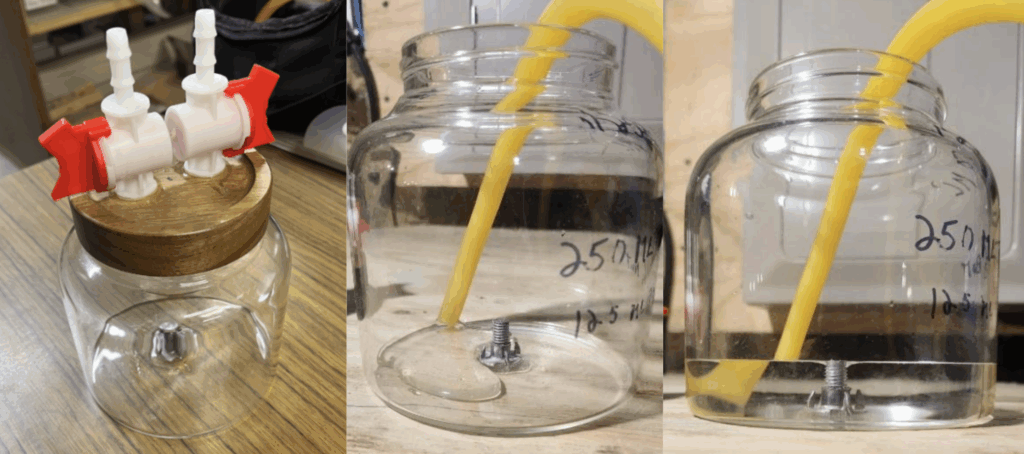
How to Assemble a Sampling Jar
Components Required:
• 1x 1250mL sampling glass
• 2x 5/16th barbed drip irrigation switch valves
• J-B Weld PlasticWeld epoxy (two-part cement)
• 1x Prolonged tree nut
• 1x Half-inch bolt
Procedure:
1. Prepare the Valves: Sand one end of each 5/16th barbed switch valve to ensure a proper bonding surface, this can be done using a bench grinder.
2. Modify the Lid: Drill two holes into the wooden lid of the container. Insert the valves into the drilled holes and secure them permanently using J-B Weld PlasticWeld epoxy. Allow the cement to cure fully.
3. Set the Measurement Indicator: Glue a prolonged tree nut to the center of the inside bottom of the jar. Thread a half-inch bolt into the nut to serve as a physical indicator for the 250mL water level.
Further Resources:
• Bill Brodhead has written a report detailing measuring radon in water using a sniffer that can be read here.
* In this paper, Bill includes a calibration factor which is not included in our steps above as we don’t think it is necessary.
•This presentation describes a similar method of measuring radon in water.